JummBox 2.1 Patch Notes
1. Overview
JummBox 2.1 is a minor update mostly for further improvements to ease-of-use. The ability to reorder and rename channels was added, alongside a playback volume bar and settings to fine-tune how louder and quieter parts of your song will sound.
Without further ado, here are the patch notes.
2. Patch Notes
- Added a menu for audio limiter settings, which can be accessed from the Edit menu or by pressing Shift-L. See section 3.1.
- Added a dropdown menu for channels, accessible by clicking on the small number by a mute button when the "Enable Channel Muting" preference is checked. See section 3.2.
- Added a volume bar. It's toggle-able via a new "Show Playback Volume" preference. It also shows up in the song player.
- When editing a custom chip instrument, there is now a "+" button that allows you to edit a larger version of the wavetable.
- A few more hotkeys for quicker access to commonly used prompts.
- Q: Channel Settings
- W: Move Notes Sideways
- L: Change Song Length
- Hold down Shift and then press Space to start playing from wherever the mouse is (this works in both the pattern editor and track editor!)
- The song name now shows up in the song recovery window.
So, let's talk about the limiter.
A limiter is a device that starts reducing the volume of audio if it gets too loud. This is to prevent your speakers from trying to play very loud sounds, which often leads to audio distortion because there are physical limits on how loud a speaker can get. JummBox (and BeepBox) has a limiter that keeps your song from getting too loud. It also has a compressor, a device which does the opposite and boosts up really quiet sounds in your song.
While the limiter/compressor in JummBox are generally helpful, they can have drawbacks. It's possible that too much volume boosting can make a part that should be quiet ear-splitting, and too much limiting may cause audio distortion as the limiter throttles the whole song volume to normalize out one loud part.
The best time to use the limiter in JummBox is actually only when needed, if you notice unwanted volume boosting or cutoff. It's also useful after your song is done to fine-tune the sound and get it to the right volume to be in line with audio standards. You can do just fine without ever touching the limiter, but it is there when needed.
Now let's take a look at the limiter menu. You can get there under "Limiter Settings..." in the Edit menu, or by pressing Shift-L.

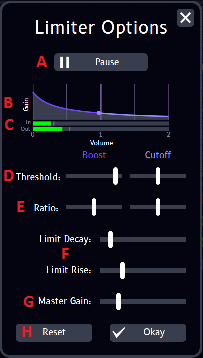
It looks a bit intimidating, but let's just go from top to bottom and I will explain what each part does.
- A: Play/pause button. Well, it does what you'd expect. I called it out here to bring attention to the fact that you can (and should!) play with the limiter settings while your song is playing.
- B: Gain curve. This is a plot of what the limiter is currently set up to do. The horizontal axis is the input volume of your song, and the vertical axis is the "gain" that the limiter will apply. This is a multiplier, so a higher gain means more volume boosting. The default BeepBox/JummBox limiter settings are pictured. They are configured so that right around 1.0 volume, there is no volume boosting or cutoff happening. After 1.0 the limiter is set up to have a perfectly inverse gain with volume increase, so that volumes over 1.0 can't be output. Since 1.0 is the maximum volume most computers/speakers will output, this is handy!
- C: Input vs. Output volume. This helps you see what your limiter is doing. When the input volume is quiet, you may see a higher input since there is a positive gain at that point. When the input is very loud, you will see some limiting.
- D: Threshold sliders. The next sliders come in pairs - one set for the compressor which "Boosts" quiet sounds, and one set for the limiter which is a "Cutoff" for loud sounds. The first setting is "Threshold", which determines what volume to start boosting/cutting off at. You can play with these sliders to see how they affect the gain curve. If you move the thresholds apart from one another, you will see a flat white line between the Boost and Cutoff region. This means there will be no change to input volume in this region.
- E: Ratio sliders. This pair of sliders controls how severe the compression/limiting is. A low level means not much change, a high level means very strong effects. Try watching the gain curve while you play with these sliders.
- F: Limit rise/decay sliders. These sliders affect how long the limiter takes to react to new volume levels. For example, if a very loud sound is played, it can take the limiter a while to "kick in" and actually normalize it to 1.0. Limit rise controls how fast the compressor/limiter will make something loud to be quiet (cutoff), or something quiet to be loud (boost). Limit decay controls how fast it returns to neutral. A higher value means the limiter responds much faster but a side effect is that the limiter becomes more audible and choppy sounding.
- G: Master Gain. This is a multiplier to your song volume, applied before limiting. With this slider, even if you touch nothing else in the limiter settings, you can get a strangely quiet or painfully loud song to be more normal. It's also helpful to boost your song to use the full audio range from 0 to 1.0, instead of just a portion of it. This is called "dynamic range" and it is generally desirable in music. The goal here is to play with this slider until the output volume throughout your whole song gets very close to 1.0 without hitting it.
- H: Reset button. This resets the limiter/compressor settings to the JummBox defaults.
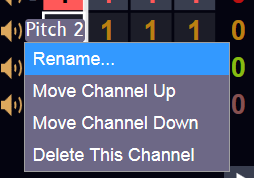
You can access the channel dropdown by clicking one of the small numbers next to a channel. Be sure you have the "Enable Channel Muting" setting enabled, or you won't be able to see this!

The options in the menu are pretty self-explanatory, here's an image of them and then I'll just mention a few things worth noting below.

- The maximum channel name length is 15 characters.
- You can't move a channel up/down if it would be moved into another category (like pitch into drums).
- To see a channel name, mouse over the little number next to the mute button once you set the name.
- To make a channel stop showing its name, erase its text and then hit enter.
That's it, so long until next time \o/
About


